Counting Our Veggies

Please join us as we focus on learning about and trying one vegetable each week.


1 Comment

Week Four: Comparing Radishes – Combining Vegetables with Math

This year, Lucie has been attending a virtual school from home. We feel very fortunate that K12.com is a public school option in our state. One of the things we love about it is that we have time to come up with our own learning projects to supplement the already comprehensive curriculum that K12.com provides. This blog is one of our projects and today’s radish project was a way of incorporating math and consumer education into our vegetables. When we shopped for radishes on Sunday, we wanted to compare the price and quality of radishes available. We shopped for radishes at Whole Foods and Hy-Vee.

We decided to measure how much radishes cost per ounce and whether the quality varied based on the price.

Whole Foods/Hy-Vee Radishes

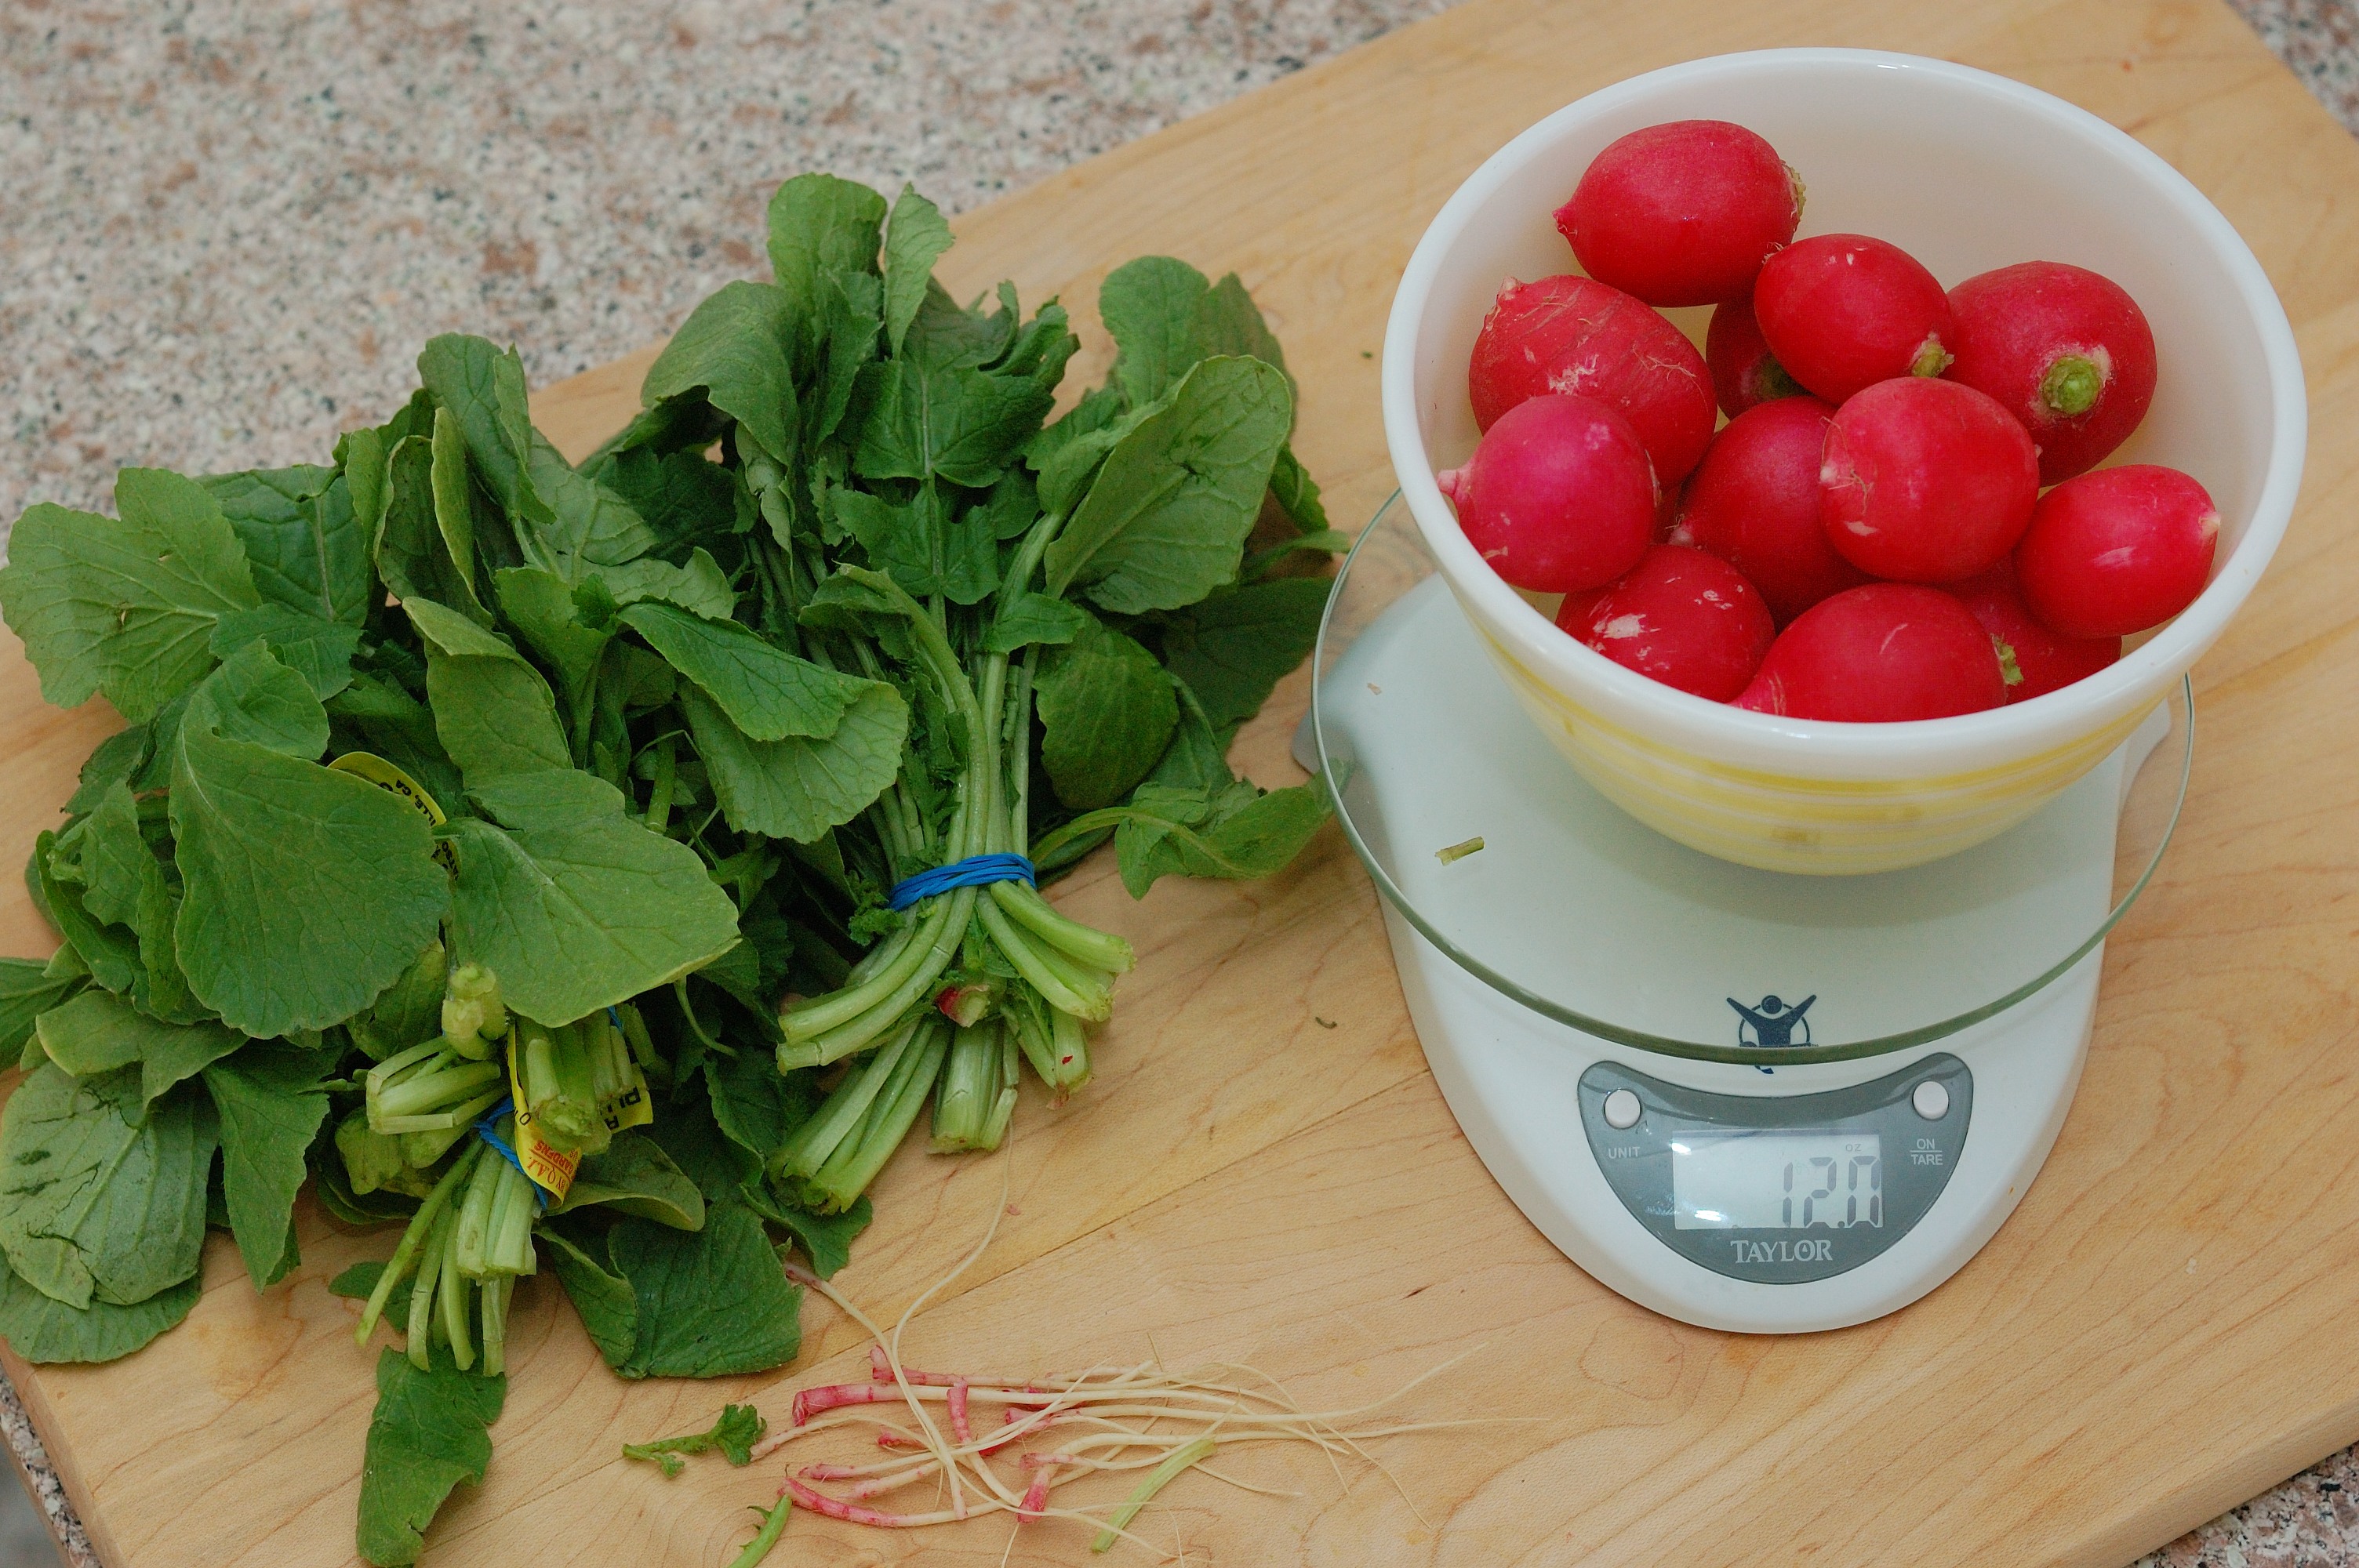
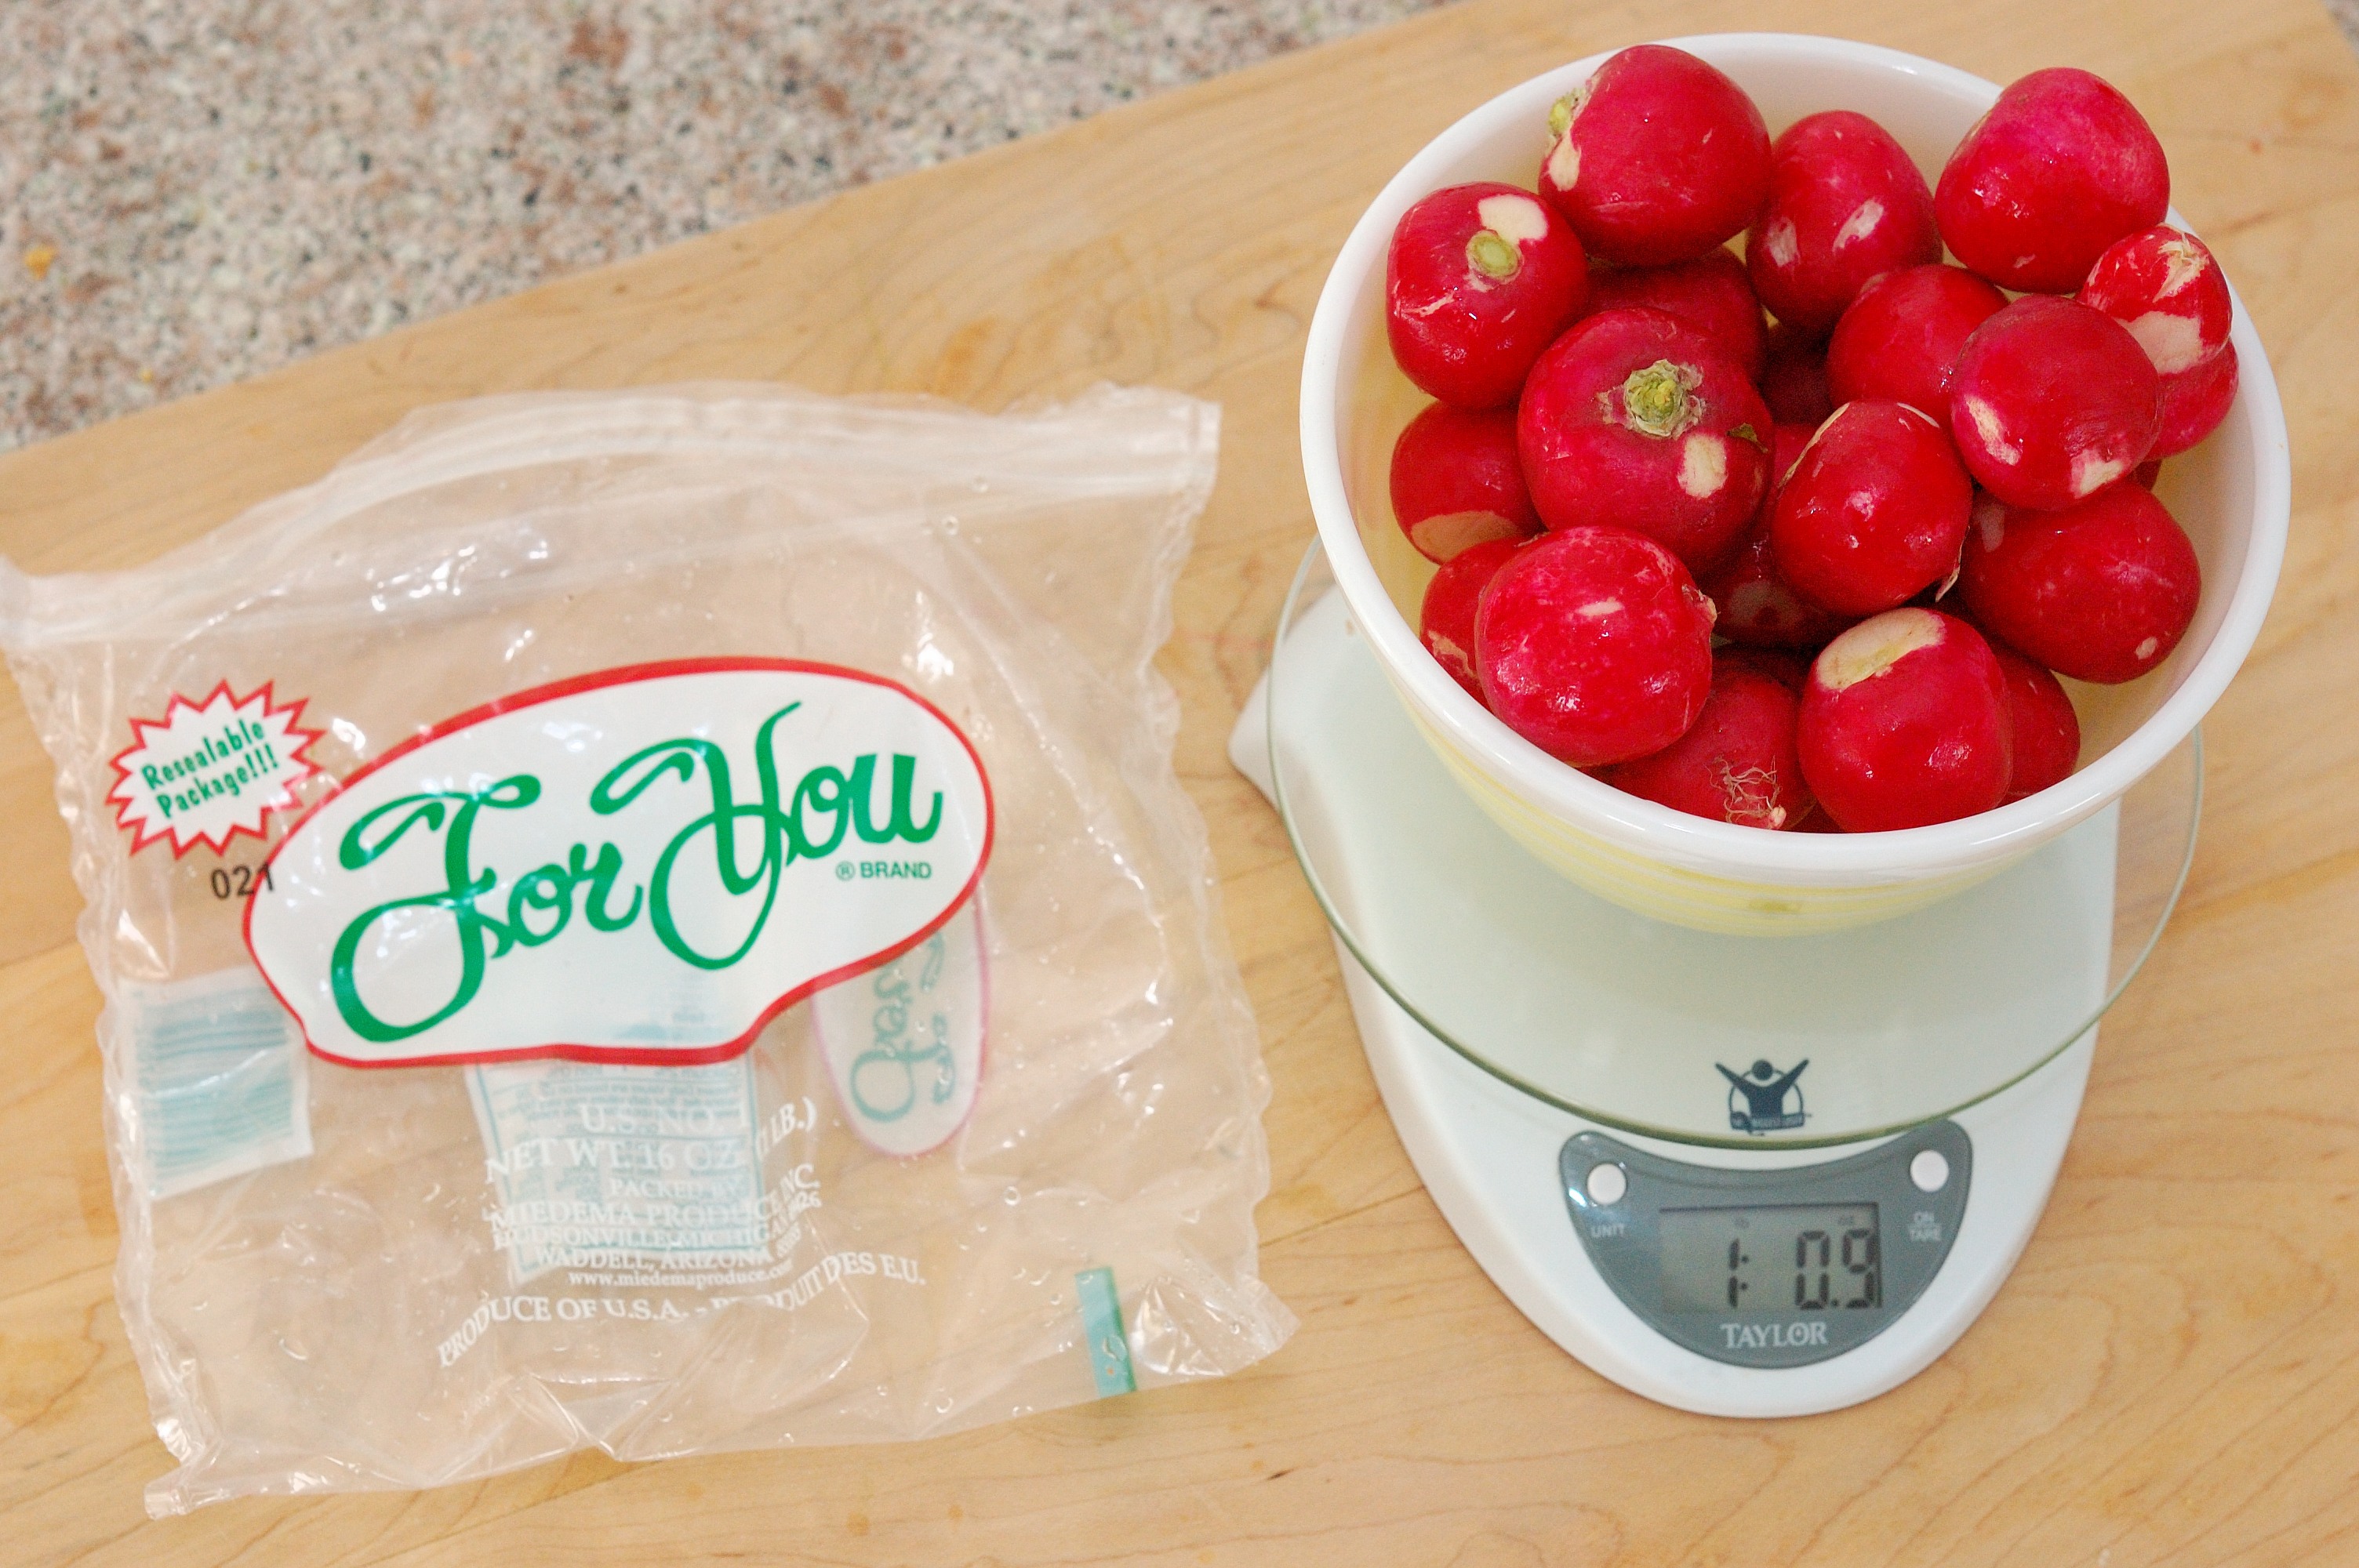
We purchased the two bunches of radishes on the left from Whole Foods. These cost $2.00 per bunch and were labeled as “organic”. We purchased the two bunches on the right from Hy-Vee. They cost $0.99 per bunch. We purchased one bag of radishes, pictured below, from Hy-Vee at a cost of $1.99.

Hy-Vee Bagged Radishes

Now to weigh the radishes.We removed the leaves and roots from all radishes before weighing, but left them in the picture for comparison.

Whole Foods bunched radishes:

Whole Foods Radishes Two Bunches

Hy-Vee Bunched radishes:

Hy-Vee Radishes Two Bunches

Hy-Vee bagged radishes:

Hy-Vee Bagged Radishes

Lucie made a table to help her compare price per ounce.  (I helped her get started and assisted with the calculator.)

Comparing Radish Prices

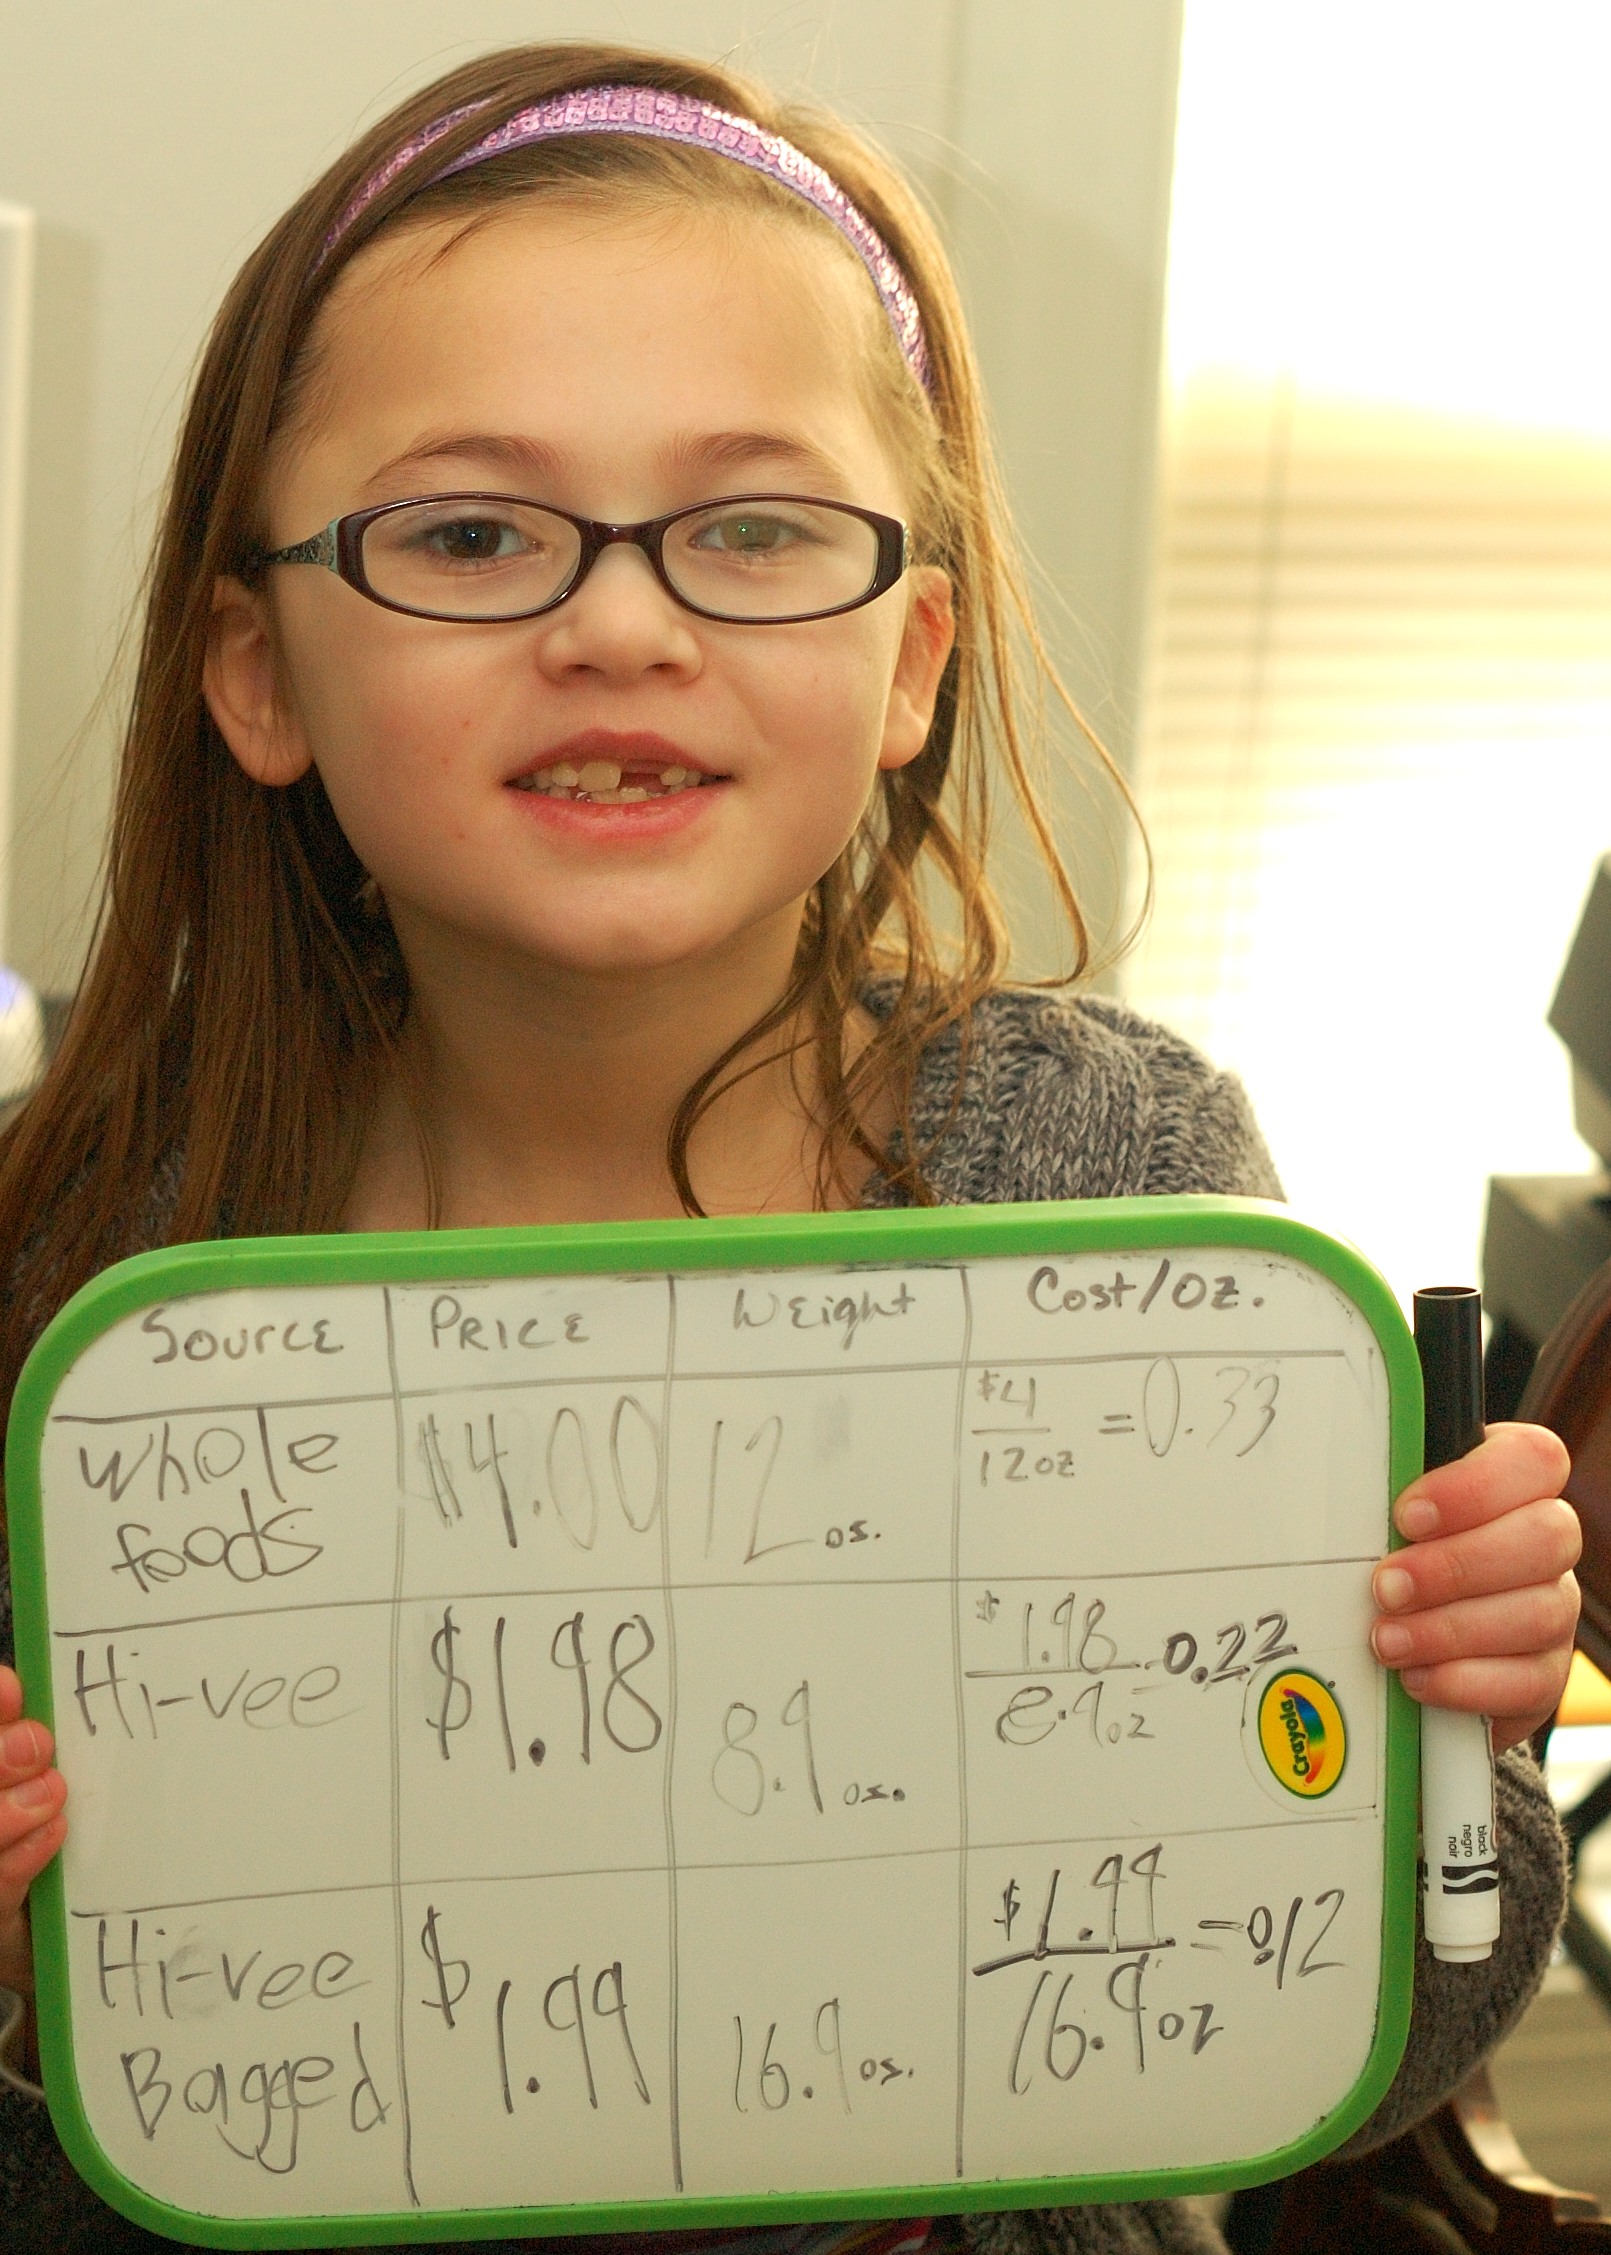
Her calculations showed that the Whole Foods bunched radishes were $0.33/oz., the Hy-Vee bunched radishes were $0.22/oz. and the Hy-Vee bagged radishes were $0.12/oz. While we were working on her table, we talked about dividing dollars into cents and rounding to the nearest penny. Lucie was frustrated that she could not divide a penny into thirds, but was able to understand why she could not. We compared the appearance of the radishes. The Whole Foods radishes were the prettiest, the Hy-Vee bagged radishes were the second most attractive and the Hy-Vee bunched radishes were the least attractive, but not bad. We found no difference when we compared the taste of the three types of radishes.

I introduced her to Microsoft Excel and helped her make a table of  the different radish attributes and a bar graph comparing price.

Type of Radish  Cost per Ounce  Amount of Leaves Appearance Organic Flavor
Whole Foods Bunch  $                     0.33 lots best yes Great
Hy-Vee Bunch  $                     0.22 few good no Great
Hy-Vee Bag  $                     0.12 none better no Great

image001

I asked Lucie to decide, based on her radish data, which type of radishes she would choose to buy and why she would choose that type.

Lucie’s response: “I would buy the bagged radishes from Hy-Vee. I want the lowest price and they all taste good. I would only care about how many leaves the radishes had if I had a pet rabbit who would like to eat the leaves. If I was making a craft out of the radishes, I would choose based on which ones were the roundest and the smoothest. I thought it was really fun to do a math calculation of radish prices and make a graph about them.”

Theo was interested in watching Lucie’s radish analysis and kept running through the kitchen to steal radish snacks.

Now, what were we going to do with all these radishes?

Thanks for visiting,

Jen

Advertisement


4 Comments

Week Four: Daikon Radish Cakes

On our Sunday radish shopping trip we purchased this:

Daikon Radish

As we left the grocery store, I wondered to myself, “What in the world am I going to do with a giant radish?”

I searched Pinterest. One of the recipes I found was for daikon radish cakes from Naturally Local. My kids love pancakes and potato pancakes, so this seemed like a reasonable thing to try.

Except that they were made from a giant radish… I had my doubts. Serious doubts.

Late this morning, I could put it off no longer. I prepared to shred the giant radish. I considered using my Cuisinart food processor, but instead decided on the Pampered Chef Ultimate Mandoline. After scrubbing the giant radish, I cut the top off and cut it into sections that would fit on the shredder. Shred, shred, shred….

Shredding Daikon Radish

And we ended up with an odd smelling pile of shredded daikon radish.

Shredded Daikon

It was a whole lot watery, so we decided to squeeze out the liquid using a mesh strainer.

Straining Daikon Radish

I would say that we ended up with one and a half to two cups of shredded radish.  We added one beaten egg, 1/2 cup panko bread crumbs, 1/8 tsp. chili pepper, 1/4 tsp. garlic powder, 1/8 tsp. salt and 1/8 tsp. pepper to the shredded radish and mixed it well with a fork.

Red Pepper_80

I’m not going to lie. It looked a little weird and smelled even weirder.

Red Pepper_70

After brushing the grilling surface with a bit of peanut oil, we scooped the mixture into small piles on our Cuisinart Griddler, using the grill-panini setting on high heat and then closed the griddler lid for about five minutes, which gave us crispy, golden-brown radish cakes. They started to smell much better as they cooked. Instead of using a griddler or panini-press, you could also cook these in a skillet or on a pancake griddle, turning them with a spatula to make both sides crispy.

Crispy Radish Cakes

The Naturally Local recipe suggested topping these cakes with sour cream and chives. I have a “no-sour-cream-on-anything-ever” policy, so we mixed some chopped chives into some softened butter and topped the cakes with that instead. They looked pretty appetizing.

Daikon Radish Cakes with Chive Butter

But how would they taste?

Red Pepper_74 Red Pepper_75

Red Pepper_77 Red Pepper_78

Initial reports were quite negative…

Two Thumbs Up for Radish Cakes

Lucie loved them. She ate three! I had to talk her into saving two for Dave to try. He also liked them.

I thought they were pretty good. My guess is that they would taste better fried in some bacon grease, but I would definitely make them again. They were similar to potato pancakes, with a slightly different flavor.

Here is a more organized version of what we did:

Daikon Radish Cakes:

Ingredients:

1 large daikon radish, thoroughly scrubbed (1 1/2 to 2 cups shredded)

1 egg, beaten

1/2 cup panko bread crumbs

1/8 tsp. chili pepper

1/4 tsp. garlic powder

1/8 tsp. salt

1/8 tsp. pepper

2 tbsp. peanut oil

1/2 cup butter, softened

handful of fresh chives, chopped

Shred the daikon radish with a food processor or mandoline. Remove excess water from shredded radish with a mesh strainer or by squeezing through cheesecloth or a clean kitchen towel. Add egg, panko bread crumbs, chili pepper, garlic powder, salt and pepper. Mix thoroughly and spoon mixture onto peanut oil coated griddler or skillet on high heat. Cook until both sides are crispy and golden-brown. 

Mix chives into softened butter. Use chive-butter mixture to top radish cakes. Makes 8-10 small cakes.

Lucie and Dave also tried a few bites of the raw daikon radish. They said it had a mild initial taste with a peppery aftertaste.

This recipe and cooking experience really goes along with the purpose of our blog. We tried a vegetable that we normally would never have tried. We had our doubts, but ended up finding a recipe that three of the five of us would like to make again. And, although Josie and Theo did not like this recipe, they willingly took one bite in order to give it a try. I think that is also a victory. (I know that Josie is making unhappy faces in many of her tasting pictures. However, she has never been “made” to try any of the vegetables in our blog and always has the option to opt out of tasting. She just tends to approach the veggies with skepticism as well as curiosity.)

We have plans for at least one more radish recipe and a fun project or two before radish week is over. Stay tuned!

Thanks for visiting,

Jen

P.S.

A few words from Lucie:

Today I used the index in my veggie book to find information about radishes and daikon radish sprouts. I read a little bit about them while we were cooking. I enjoyed helping Mama in the kitchen today. I want to take cooking classes when I get older. I give the radish pancakes two thumbs up and I would like to try them again.

Lucie Using the Index


1 Comment

Week Three: Roasted Tomato and Red Pepper Soup

Have I mentioned that my kids love eating bell peppers? I got these peppers out of the fridge to use in the soup and the little pepper-munchers wanted me to cut them up so they could eat them right away. Red Pepper_33

This past summer, when garden fresh tomatoes, red peppers and herbs were plentiful, I tried a recipe for garden fresh tomato basil soup from Will Cook for Friends. It was wonderful! I made it several times and made a few changes, adding more red pepper and using chicken broth in place of water. With garden fresh tomatoes months away, I wanted to try a winter version of this favorite soup of ours. Instead of fresh tomatoes, I tried canned fire roasted tomatoes from Costco.

Red Pepper_32

I cut up two really big red peppers, drizzled a bit of olive oil on them and roasted them in the oven at 400 degrees for about 45 minutes.

Red Pepper_30  Red Pepper_29

I added them to three minced cloves of garlic and half of a chopped up white onion that I had sauteed in olive oil. Then, I added two cans of the tomatoes, one and a half tablespoons of dried oregano, three tablespoons of dried basil, a pinch of sugar, a tablespoon of balsamic vinegar and a cup of chicken broth. I blended it all with my handy immersion blender and added some salt and pepper to taste. Theo was curious about the noise from the blender and was the first to come try some soup. He wanted a few croutons in his.

Red Pepper_28   Red Pepper_27

He loves tomato soup and croutons and was quick to give it two thumbs up. (You can see his day and a half old water park wrist band, still on his arm. He refuses to let us remove it. He is just sure that he will need it when he goes back to the water park “tomorrow”. It has got to go tonight at bath time!)

Red Pepper_25

I called in the girls, who were busy pretending to be super-hero-best-friend-sisters. Super hero #1 was not happy to have her super hero activities interrupted. She gave two thumbs down, but did offer to eat the rest of the soup in her bowl in exchange for croutons.

Red Pepper_26

Super hero #2 was happier to taste the soup. She requested goat cheese and crouton topping and happily ate it, giving a two thumbs up rating.

Red Pepper_24  Red Pepper_23

Dave and I were both pleasantly surprised with how much we liked this version of the soup. We were afraid that using canned tomatoes and dried herbs would ruin it, but we found that using the canned fire roasted tomatoes gave it a nice flavor. I love the roasted red pepper in this soup. If the peppers I used hadn’t been huge, I might have even added one more. We also love our tomato soup with goat cheese and croutons.

Roasted Tomato and Red Pepper Soup:

Ingredients:

  • 4 tbsp. olive oil
  • 2 large red bell peppers
  • 2  cans (14.5 oz. each) of fire roasted tomatoes
  • 1/2 of a large white onion, chopped
  • 3 cloves of garlic, minced
  • 1 cup chicken broth (you could use vegetable broth or water instead)
  • 1.5 tbsp. dried oregano
  • 3 tbsp. dried basil
  • 1 tbsp. balsamic vinegar
  • salt, pepper and a pinch of sugar to taste
  • goat cheese
  • croutons

Preheat oven to 400 degrees. Quarter and remove seeds from bell peppers. Drizzle with 2 tbsp. olive oil and bake in a baking dish at 400 degrees for about 45 minutes to roast. Saute onion and garlic in 2 tbsp. olive oil over medium-high heat in a medium soup pot. Add the tomatoes and roasted red peppers to the garlic and onions. Add the chicken broth, basil, oregano, balsamic vinegar, and sugar. Simmer for a few minutes before using the immersion blender. Make it as chunky or smooth as you like. Add salt and pepper to taste. Add more chicken broth if you think it is too thick. Garnish with plenty of goat cheese and croutons. Enjoy!

Thanks for visiting, Jen

P.S.

A few words from Lucie:

I love this soup, especially with goat cheese. I thought it was even better than the soup we made this summer and I would have eaten even more if I had been hungrier.